
How to build an AI alt text generator for Mac and iPhone
By Anne-Mieke Bovelett on June 14, 2026
Status: updated (now works in the finder and photos app as well)
Automate your accessibility workflow with a free, cross-platform Apple Shortcut
To generate image alt text automatically across all your Apple devices, you can build a universal Apple Shortcut that intelligently detects your input. Whether you select a physical file via macOS Finder Quick Actions, trigger it from the iOS Photos Share Sheet, or simply run it on a clipboard screenshot, the shortcut encodes the image data with Base64 and sends a POST request to the Google Gemini API. The resulting AI text response is instantly parsed and copied right back to your clipboard, ready to paste in under two seconds.
To generate image alt text automatically on macOS and iOS, you can build an Apple Shortcut that encodes image data with Base64 and sends a POST request to the Google Gemini API. The resulting AI text response is parsed using native Shortcut dictionary values and copied back to your clipboard instantly across all your Apple devices.
Writing alt text for images is essential for web accessibility (which is important for all users, including search bots and agentic AI!), but doing it manually can completely interrupt your workflow. And that’s not just my own experience, I hear this as a complaint, especially from social media managers who work under pressure and often end up skipping the alt text because of the process.
If you are an Apple user, you can automate this entire process. By combining the native Apple Shortcuts app with the Gemini API, you can create a global shortcut that seamlessly handles images shared from your Photos app, file clicks in Finder, or screenshots copied directly to your clipboard, replacing them with accurate, accessibility-focused alt text descriptions in under two seconds.
Is this free to use?
Yes, absolutely. You do not need a paid Google Workspace subscription or a developer account to use this tool.
- Account type: Anyone with a standard, free personal Google account (like a gmail.com address) can access the Gemini API.
- Model used: Gemini 2.5 Flash
- Free tier limits: Up to 15 requests per minute and 1,500 requests per day.
Unless you are generating alt text for thousands of images a day, your new automation tool will cost you exactly $0.00 to run.
Prerequisites: Get your free API Key
Before starting, you need an API key to let your Shortcut talk to Gemini behind the scenes:
- Head over to the Google AI Studio website.
- Sign in with your standard Google account.
- Select the option to generate a new API key.
- Copy the key somewhere safe, you’ll need it in a moment.
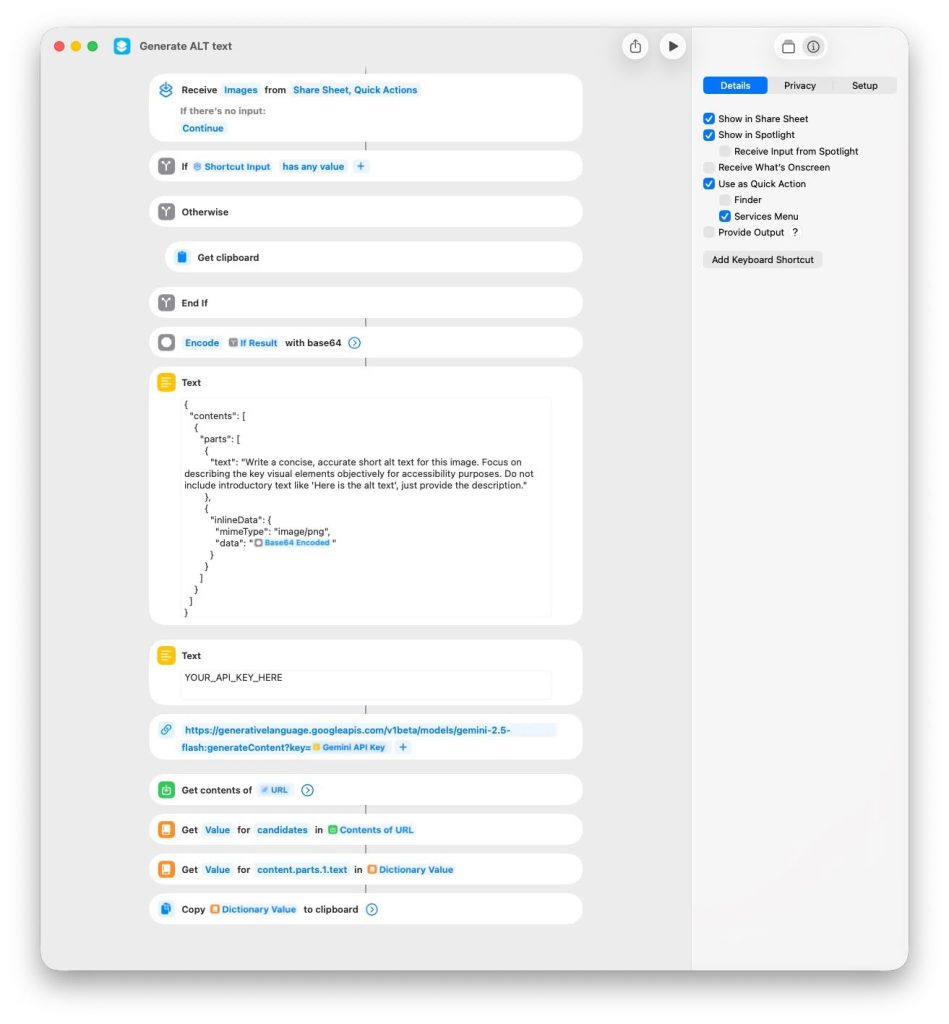
Step-by-step shortcuts setup
Open the Shortcuts app on your Mac or iOS device, create a new shortcut, and assemble the following actions in order:
1. Configure the Setup Inputs
Look at the very first default block at the top of your workflow window. We need to tell the shortcut to listen for shared files from other apps.
- Click the blue variables inside that top block and set it to read:
Receive [Images] from [Share Sheet and Quick Actions]. - Set the fallback option right below it to:
If there's no input: [Continue].
2. Add the Smart Sorting Logic
Search for the If action in the right-hand library and drag it into your workflow. This creates a branching path so the shortcut can instantly tell the difference between a shared file and a clipboard screenshot.
- Click the first parameter inside the If box and change it to
Shortcut Input. - Click the next parameter and select
has any value. - Search for the Get Clipboard action in the library and drag it directly inside the Otherwise slot of your If block.
3. Encode with Base64
Add the Base64 Encode action right below the End If line.
- Click its blue target variable and change it to the magic variable If Result.
- The line should now read:
Encode [If Result] with Base64. - Click the dropdown arrow on that action and set Line Breaks to None.
4. Build the JSON payload
Add a Text action box. Inside it, copy and paste the exact JSON text configuration below:
{
  "contents": [
    {
      "parts": [
        {
          "text": "Write a concise, accurate short alt text for this image. Focus on describing the key visual elements objectively for accessibility purposes. Do not include introductory text like 'Here is the alt text', just provide the description."
        },
        {
          "inlineData": {
            "mimeType": "image/png",
            "data": "BASE64_VARIABLE"
          }
        }
      ]
    }
  ]
}- Variable Step: Inside the code block above, delete the
BASE64_VARIABLEplaceholder text, but leave the quotation marks. Right-click (or long-press on mobile) between the quotes, select Insert Variable, and choose theBase64 Encodedpill from your previous step. - Labeling your box: To keep your shortcut organized, click on the blue text variable token at the bottom of your workflow where this box is referenced, and rename it to
JSON Payload.
5. Provide the API key box and URL
To make this shortcut easy to share later without leaking your private data, we use a dedicated text box for the key itself.
- Add a second Text action box right below your JSON payload. Paste your raw Google API key inside it. Click its variable token and rename it to
Gemini API Key. - Add a URL action box right below that. Paste the following URL:
https://generativelanguage.googleapis.com/v1beta/models/gemini-2.5-flash:generateContent?key= - Right-click immediately after the
=sign at the end of that URL, select Insert Variable, and choose yourGemini API Keytext pill.
6. Send the API request
Add the Get Contents of URL action. It will automatically connect to your URL action above. Click the arrow to expand its details and configure it exactly like this:
- Method: POST
- Headers: Add a new header where the Key is
Content-Typeand the Value isapplication/json. - Request Body: Set this to
File. - File: Click this and choose your
JSON Payloadvariable.
7. Parse the response and copy
Gemini returns a clean text answer buried inside a complex data structure. Because Apple Shortcuts lists are 1-indexed, we extract it using these final three actions:
- Get Value from Dictionary: Set it to look for the key
candidatesinContents of URL. - Get Value from Dictionary: Set it to look for the key
content.parts.1.textin the previousDictionary Value. - Copy to Clipboard: Pass that final
Dictionary Valuestraight to your clipboard.
What it should look like
If you’re visually oriented, you probably appreciate a screenshot! Here you go:
How to trigger the shortcut faster
Now that the logic is done, you don’t want to open the Shortcuts app every time you need an alt text description. By opening the Shortcut Details panel (the “i” icon or sliders menu on the right side of the screen), you can weave this tool straight into macOS and iOS.
Triggering on macOS
- The Keyboard Shortcut: In the Details panel, click “Add Keyboard Shortcut” and assign a quick combo (like
Option + A). Whenever you copy an image or take a screenshot, just hit those keys to instantly replace the image on your clipboard with text. - Spotlight Search: Because it lives natively in the ecosystem, you can hit
Cmd + Spaceat any time, type the name of your shortcut (e.g., text alt), and hit Enter. It will analyze your clipboard immediately. - Quick Actions / Finder Menu: In the Details panel, check the box for Use as Quick Action and check Finder. Now, you can right-click any raw image file on your Mac, hover down to “Quick Actions,” and select your shortcut to run it straight on that file.
Triggering on iOS (iPhone and iPad)
Because your shortcuts sync automatically via iCloud, the workflow is instantly ready for your mobile devices.
- The Share Sheet: In the Details panel, check the box for Show in Share Sheet. Now, when browsing your Photos app, managing social media, or looking at a file, you can tap the native Share icon, scroll down, and trigger the tool directly from the share menu.
- Back Tap: Go to Settings > Accessibility > Touch > Back Tap and assign the shortcut to a double-tap. This allows you to instantly generate alt text for whatever image is sitting on your mobile clipboard with two quick taps on the back of your phone.
Before you blindly paste that alt text in
One thing to keep in mind: screen readers read alt text out loud, and unlike a paragraph of text, a listener can’t pause mid-description. That means alt text needs to land in one go.
Gemini won’t know the difference between an informative image and a decorative one. It doesn’t know the context of your article or your post, who your audience is, or what the image is meant to communicate. If an image is purely decorative, it doesn’t need alt text at all. The shortcut in this tutorial gives you a starting point, not a finished result. Read what it generates, check whether it actually describes what matters in the image, and fix it if it doesn’t.
One more practical rule: keep alt text short. If you feel the image needs more than 125 characters to describe, that’s a signal worth paying attention to. Either the image is doing too much work and needs to be simplified, or the content it contains belongs in a proper caption or description below the image, not crammed into an alt attribute.
If you want to go deeper on when to write alt text and when to leave it empty, the Web Accessibility Initiative has a decision tree in their images tutorial that walks you through it clearly.
Too technical for you? Download the shortcut
Don’t want to build it yourself? You can also download this ALT text Shortcut from iCloud. Open it, follow the instructions in the , add your API key, and you’re good to go.